How to install aws container insights for EKS

In this post we will be installing aws container insights for eks. We are assuming that you have already running EKS cluster.
1. Attaching Policy to EKS NodeGroup IAM Role
For this first we need to attach an policy to our nodegroup iam role CloudWatchAgentServerPolicy
2. Installing AWS Container Insights for EKS
Install the container insights using the below commands
1export AWS_REGION=us-east-2
2export CLUSTER_NAME=<your-cluster-name>
3
4curl -s https://raw.githubusercontent.com/aws-samples/amazon-cloudwatch-container-insights/latest/k8s-deployment-manifest-templates/deployment-mode/daemonset/container-insights-monitoring/quickstart/cwagent-fluentd-quickstart.yaml | sed "s/{{cluster_name}}/${CLUSTER_NAME}/;s/{{region_name}}/${AWS_REGION}/" | kubectl apply -f -
It will create some resources while its execution
 1namespace/amazon-cloudwatch created
 2serviceaccount/cloudwatch-agent created
 3clusterrole.rbac.authorization.k8s.io/cloudwatch-agent-role created
 4clusterrolebinding.rbac.authorization.k8s.io/cloudwatch-agent-role-binding created
 5configmap/cwagentconfig created
 6daemonset.apps/cloudwatch-agent created
 7configmap/cluster-info created
 8serviceaccount/fluentd created
 9clusterrole.rbac.authorization.k8s.io/fluentd-role created
10clusterrolebinding.rbac.authorization.k8s.io/fluentd-role-binding created
11configmap/fluentd-config created
12daemonset.apps/fluentd-cloudwatch created
For verification use the below command
1$ kubectl -n amazon-cloudwatch get daemonsets
2NAME                 DESIRED   CURRENT   READY   UP-TO-DATE   AVAILABLE   NODE SELECTOR            AGE
3cloudwatch-agent     1         1         1       1            1           kubernetes.io/os=linux   54m
4fluentd-cloudwatch   1         1         1       1            1           <none>                   54m
Now the container insights will show you nothing at first, you need to configure and deploy an application on eks cluster to see the results
3. Deploying an Application using HELM
We will be installing wordpress application using helm. Create a namespace for wordpress
1$ kubectl create namespace wordpress
Add the repository for Bitnami Helm Charts.
1$ helm repo add bitnami https://charts.bitnami.com/bitnami
Deploy wordpress in its own namespace.
1$ helm -n wordpress install wordpress-app bitnami/wordpress
To verify the deployment is successfull or not use the below command.
1$ kubectl -n wordpress rollout status deployment wordpress-app
Once the above command is successfull it will show the below output
1Waiting for deployment "wordpress-app" rollout to finish: 0 of 1 updated replicas are available...
2deployment "understood-zebu-wordpress" successfully rolled out
4. Get the URL to Access the Application
Use the below command to access the URL
1$ export SERVICE_URL=$(kubectl get svc -n wordpress wordpress-app --template "{{ range (index .status.loadBalancer.ingress 0) }}{{.}}{{ end }}")
2$ echo "Public URL: http://$SERVICE_URL/"
To access the wordpress admin interface use the below command
1$ export ADMIN_URL="http://$SERVICE_URL/admin"
2$ export ADMIN_PASSWORD=$(kubectl get secret --namespace wordpress-cwi understood-zebu-wordpress -o jsonpath="{.data.wordpress-password}" | base64 --decode)
3
4$ echo "Admin URL: http://$SERVICE_URL/admin
5Username: user
6Password: $ADMIN_PASSWORD
7"
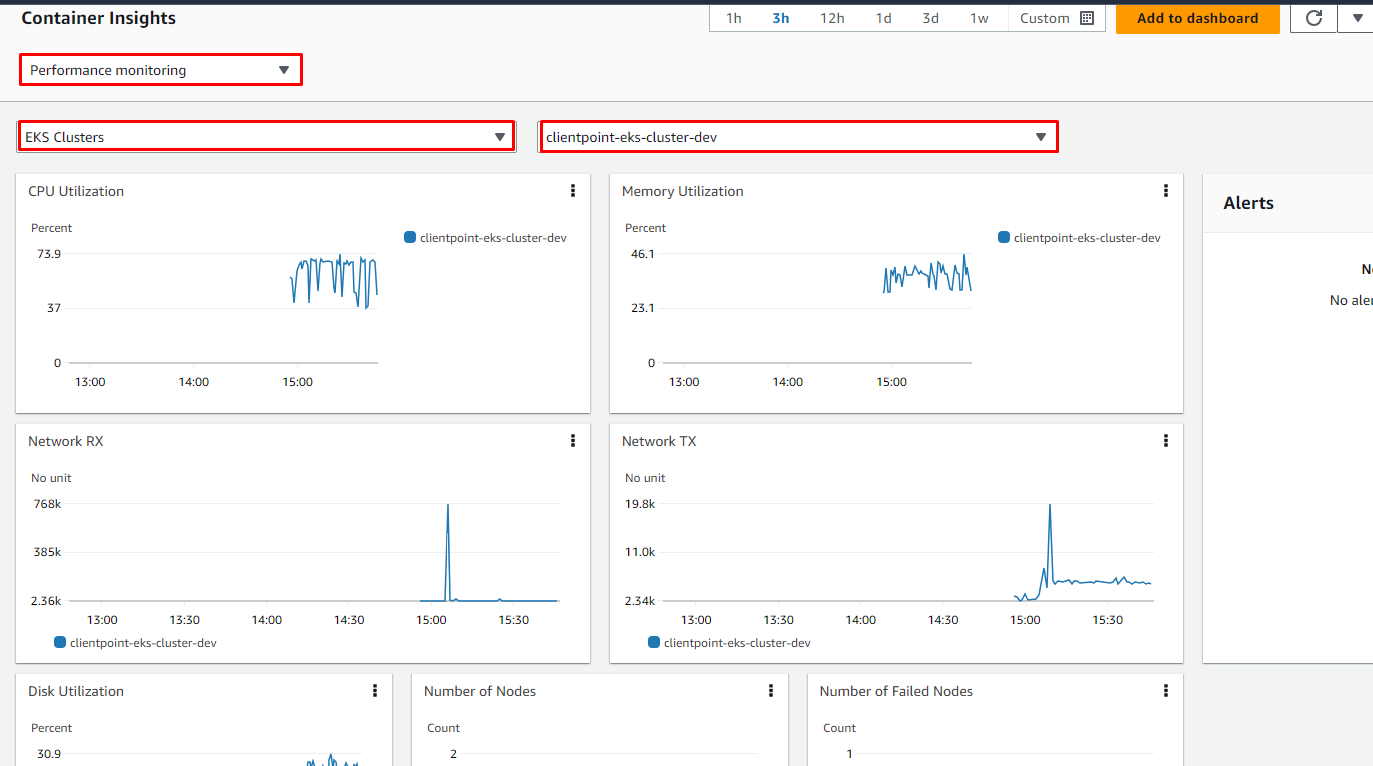
Once you logged with this user you container insights metrics will be enabled. Just go to Cloudwatch
- Goto Cloudwatch -->
Insights - Then
Container Insights - Select
Performance Monitoringfrom drop down. - Select
EKS Clusters
